Ingredients You’ll Need
- 1 cup (120g) All-Purpose Flour: *Crucially, this needs to be heat-treated for safety. See our Chef’s Tips section for easy instructions.*
- ½ cup (113g) Salted Sweet Cream Butter, *softened to room temperature*: *Ensure it’s truly soft for a creamy base. If using unsalted butter, add an extra pinch of fine sea salt.*
- ⅓ cup (67g) Light Brown Sugar, *firmly packed*: *Provides a beautiful caramel undertone and essential moisture.*
- ¼ cup (50g) Granulated Sugar: *For a balanced sweetness and tender crumb.*
- 2 tablespoons Whole Milk: *Contributes to the moistness and helps bind the cookie dough base. Any milk will work, but whole milk adds richness.*
- 1 teaspoon Pure Vanilla Extract: *Use a good quality extract for the best classic cookie dough flavor.*
- ¼ teaspoon Fine Sea Salt: *Enhances all the other flavors and prevents the fudge from being overly sweet.*
- 14 ounce (396g) can Sweetened Condensed Milk: *The key to a smooth, creamy, and perfectly set fudge texture.*
- 1½ cups (255g) White Chocolate Chips, *high quality*: *Choose a reputable brand for optimal melting and flavor. Alternatively, use finely chopped white chocolate bars.*
- 2 cups (340g) Semi-Sweet Chocolate Chips, *divided*: *One cup for folding into the cookie dough, and one cup for sprinkling on top. Dark chocolate chips can be used for a more intense chocolate flavor.*
Step-by-Step Instructions
Step 1
**Prepare Your Baking Dish & Chill Chips:** Begin by lining an 8×8-inch (20×20 cm) baking dish with parchment paper. Allow the parchment to overhang on two sides; this creates “handles” for easy removal of the set fudge later. Lightly spray the exposed baking dish and the parchment paper with nonstick cooking spray. Next, measure out 1 cup of the semi-sweet chocolate chips and place them in a small Ziploc bag or an airtight container. Pop these into the freezer while you prepare the rest of the recipe. Chilling them prevents them from melting and streaking the dough when incorporated.
Step 2
**Cream the Cookie Dough Base:** In a medium-sized mixing bowl, using a handheld electric mixer, combine the softened salted sweet cream butter, granulated sugar, light brown sugar, whole milk, pure vanilla extract, and fine sea salt. Beat on medium-high speed for 1½ to 2 minutes, or until the mixture is light, fluffy, and visibly well combined. This step incorporates air and ensures the sugars are mostly dissolved, leading to a smoother cookie dough texture.
Step 3
**Gently Add Heat-Treated Flour:** Reduce your mixer speed to low. Gradually add the heat-treated all-purpose flour to the wet ingredients, mixing just until it’s fully incorporated and no dry streaks of flour remain. Be mindful not to overmix at this stage; overmixing can develop gluten and result in a tougher, less tender cookie dough base.
Step 4
**Fold in Frozen Chocolate Chips:** Remove the frozen 1 cup of semi-sweet chocolate chips from the freezer. Using a sturdy wooden spoon or a robust spatula, gently fold these cold chips into your prepared cookie dough mixture. The cold temperature of the chips is crucial here, as it helps them maintain their shape and prevents them from melting and discoloring your beautiful cookie dough.
Step 5
**Create the White Chocolate Fudge Layer:** In a separate, microwave-safe bowl, combine the entire 14-ounce can of sweetened condensed milk with the 1½ cups of white chocolate chips. Microwave on high power in 30-second intervals, stirring thoroughly after each interval, until the white chocolate chips are completely melted and the mixture is smooth, glossy, and fully combined. Alternatively, you can melt these ingredients together in a heatproof bowl set over a pot of simmering water (a double boiler), stirring until smooth.
Step 6
**Combine Fudge and Cookie Dough:** Pour the warm white chocolate fudge mixture directly over the cookie dough in the mixing bowl. Using a spatula, gently fold and stir the two components together. Continue to mix just until all ingredients are well combined and the cookie dough is evenly distributed throughout the white chocolate fudge. Avoid excessive stirring to maintain the delicate texture.
Step 7
**Assemble and Chill:** Spoon the entire cookie dough fudge mixture evenly into your prepared 8×8-inch baking dish. Use the back of a spoon or a small offset spatula to gently press down and smooth the top surface. Evenly sprinkle the remaining 1 cup of semi-sweet chocolate chips over the top of the fudge, then very gently press them into the surface to ensure they adhere. Cover the dish tightly with plastic wrap and refrigerate for a minimum of 2 hours, or ideally overnight, allowing the fudge to set completely firm.
Step 8
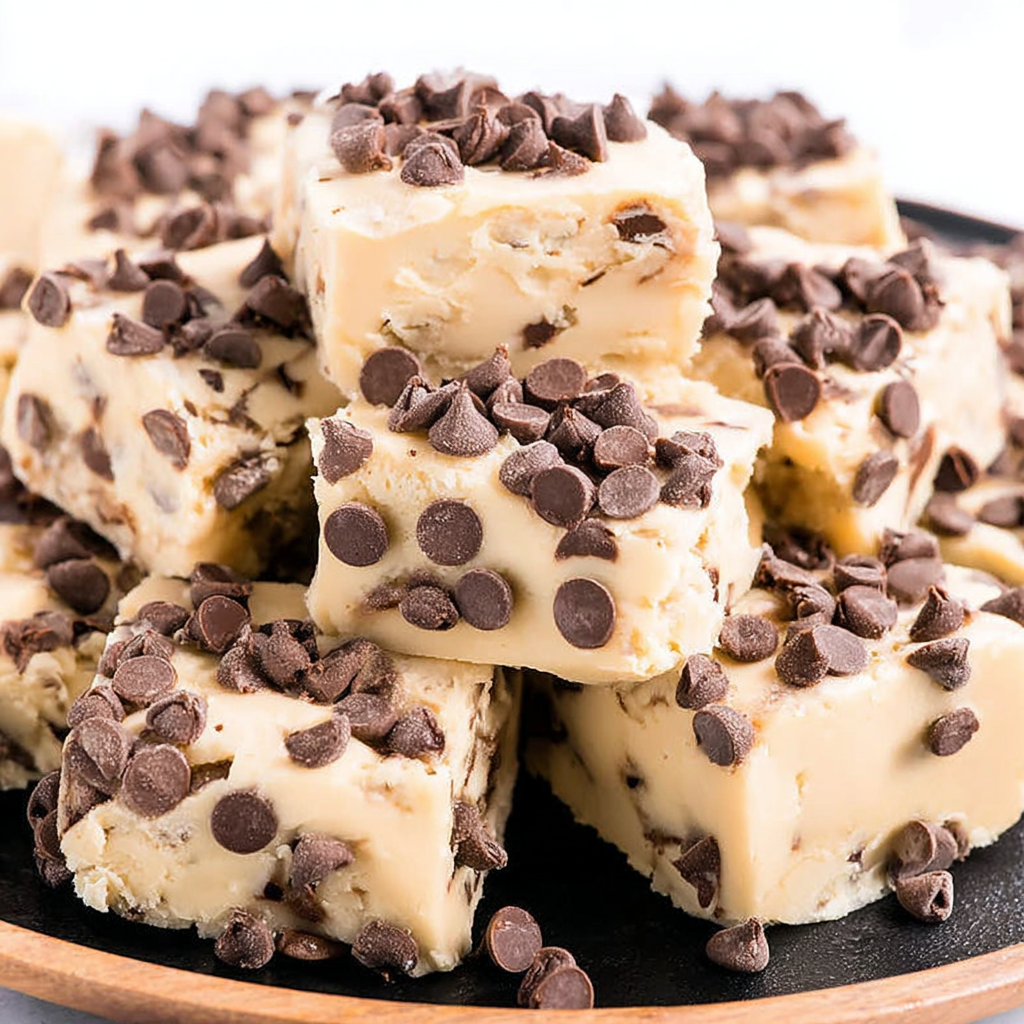
**Slice and Serve:** Once the fudge is thoroughly chilled and firm, remove it from the refrigerator. Use the parchment paper overhangs to carefully lift the entire block of fudge out of the pan and transfer it to a clean cutting board. Using a large, sharp knife, cut the fudge into 25 equal squares (5 pieces across by 5 pieces down). For the cleanest cuts, wipe your knife with a warm, damp cloth between each slice. Serve immediately and revel in this delicious no-bake treat!
Chef’s Tips & Variations
**Chef’s Tips for Fudge Perfection:** * **Crucial Flour Safety:** Always heat-treat your flour when making no-bake treats. Spread the all-purpose flour evenly on a baking sheet and bake at 300°F (150°C) for 5-7 minutes, or microwave it on high in 1-minute intervals, stirring between each, until it reaches an internal temperature of 160°F (71°C). Allow it to cool completely before using. This step eliminates any potential bacteria, making your cookie dough safe to eat raw. * **Room Temperature Butter Matters:** Ensure your butter is truly softened to room temperature. This allows it to cream properly with the sugars, creating a smooth, airy base for your cookie dough that integrates beautifully with the fudge. * **Don’t Overmix the Flour:** Once you add the heat-treated flour, mix only until just combined. Overmixing can develop the gluten in the flour, leading to a tougher, chewier texture rather than the desired tender cookie dough. * **Clean Cuts Every Time:** For perfectly neat squares, use a sharp, warm knife. Run your knife under hot water, wipe it dry, then make a cut. Repeat for each slice. This prevents the fudge from sticking and tearing. **Delicious Variations & Serving Suggestions:** * **Nutty Indulgence:** For added crunch and flavor, fold in ½ cup of finely chopped pecans or walnuts along with the frozen chocolate chips into the cookie dough base. * **Festive Funfetti:** Make it a party by folding in ¼ cup of colorful sprinkles (jimmies work best) into the cookie dough mixture before combining with the fudge. * **Mocha Swirl:** Add 1 teaspoon of instant espresso powder (dissolved in 1 teaspoon of hot water) to the white chocolate fudge mixture for a subtle coffee note that enhances the chocolate flavors. * **Storage & Make-Ahead:** This Cookie Dough Fudge stores wonderfully! Keep it in an airtight container in the refrigerator for up to one week. You can also freeze individual squares for up to one month; simply thaw slightly before enjoying.
Frequently Asked Questions
Why do I need to heat-treat the flour for this no-bake recipe?
Raw flour can sometimes contain harmful bacteria like E. coli. Heat-treating the flour by baking or microwaving it until it reaches 160°F (71°C) makes it safe to consume without cooking, ensuring your delicious cookie dough fudge is worry-free.
Can I use different types of chocolate chips in this fudge?
Absolutely! Feel free to customize your fudge by using milk chocolate, dark chocolate, butterscotch, or even peanut butter chips. For the white chocolate fudge layer, ensure you use high-quality chips that melt smoothly for the best results.
How long does this Cookie Dough Fudge stay fresh, and how should I store it?
When stored in an airtight container in the refrigerator, this delectable fudge will remain fresh for up to one week. For longer storage, you can freeze individual squares for up to one month, letting them thaw briefly before serving.
My fudge didn’t set properly. What might have gone wrong?
The most common reason for soft fudge is insufficient chilling time. Ensure it refrigerates for at least 2 hours, and preferably overnight, to allow it to firm up completely. Using a high-quality sweetened condensed milk and white chocolate also helps achieve the correct set.
Is it possible to make this recipe gluten-free?
Yes, you can adapt this recipe to be gluten-free! Simply substitute the all-purpose flour with a heat-treated gluten-free all-purpose flour blend. Look for a blend that contains xanthan gum for the best texture and binding results.